
Adding records to your MNS identity allows you to enrich identity with TXT and Address types of associated records. You can add information such as bios, links to websites, social media accounts, as well as add custom information, therefore you can present yourself in the blockchain world. Also, you can link all your cryptocurrency wallets or contract addresses on various available Networks.
Let’s dive deeper into both types of Records. Here’s a guide how to navigate to Records:
1. Navigate to the MNS Home page, select network, and connect your wallet (see how to connect wallet ADD LINK).

2. In the upper right corner click “Menu” button and choose “My identities” from the list.

3. After navigating to My identities page, click the identity you want to add records to.

4. On your Identity details page in the Records tab you can see two sections: TXT and Address.

5. Let’s add TXT record simply by clicking “+ Add Record”.

- In the opened modal window click “Key” and from the drop-down menu choose the type of record: Website, Nickname, Shortbio, or Custom.

- Enter the value and click “Add”.

- See the added record in the TXT section and the bar at the bottom of the page notifying you about the performed changes.

- Add more records to describe your digital profile.

- Add your changes by clicking “Save” at the bottom of the page.

6. Approve the transaction in the wallet modal window and see a notification about successfully added records.

7. In the Address section you can find already created by the system Address record, which is the address of Primary identity (Primary identity is displayed instead of wallet address in blockchain scans and dApps).

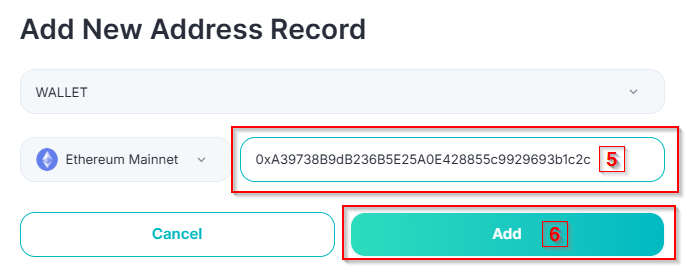
8. Click “+Add Record” to add more address records.

- In the opened window click “Type” and from the drop-down menu choose the type of record: Wallet, Contract.

- Click “Network” and from the drop-down menu choose Network you want to add. Another option is to start typing the Network in the search field.

- Add the address and click “Add”.
- See the added record in the Address section and the bar at the bottom of the page notifying you about performed changes. Click “Save”, approve the transaction in the wallet modal window, and see a notification about successfully added records (same as for TXT records).

9. Ready! You created your digital profile!

Follow us on social media for the latest updates:
Website | Twitter | Instagram | Discord | Youtube | Telegram | Linkedin | Facebook


